
This project represented a whole passel of challenges and techniques I'd never used before. But why make something if I can't make it just how I want?
Step One:
Think about a style/design.
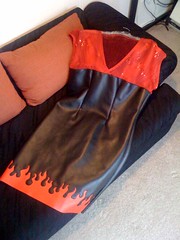
The party flyer stated "black tie optional, but suggested." I thought of a nice straight silhouette in black with some white detail, or interesting embellishment. Out of my 157 owned patterns, 24 of which are dresses, not one struck me as appropriate. Shocking. I settled on Vogue 8313, View A. The body of the dress would be snug black stretch vinyl, the upper would be sheer white (probably), and along the bottom, red flames, preferably in a reverse applique.
Step Two:
Get supplies.
Wearable vinyl is not easy to come by. In metro Detroit, there are really only two options for fabric: Joann on the low end or Haberman Fabrics on the high. Neither had a suitable vinyl. Online, there are many fabric sellers specializing in stretch/costume fabrics. I made an order from Spandex House, for both black and red stretch pleather. It came quickly, but smelled horrible. The nasty petroleum smell was almost unbearable. The pleather is washable, though, so I ran both pieces through the wash. Still smelled. I left the large uncut pieces flattened out in my sewing area for a couple of days, hoping they would off-gas. It improved the smell a bit, but there seemed to be no getting rid of it. I know my sense of smell is a bit more acute than usual, and that I would ultimately be in a smoky nightclub, so I decided to go ahead with it.
For once, Joann was not having a pattern sale right when I needed it, so I actually paid full price for a Vogue pattern (which is to say, 50% off the MSRP). Yet another element of this project I'd never done before.

Test dress.
Vinyl is unforgiving; you cannot sew it and tear it back apart. Also, no matter how carefully I take my own measurements, pattern measurements seem a crapshoot. I decided to make a test dress out of a large piece of woven I had in scrap. It came together quickly and fit so well that I omitted the zipper. I actually finished that dress and it's entirely wearable. (And, as always, less weird/lumpy than it looks when I hastily cram it on the dummy for photos.)
What about this applique nonsense?
I got enough vinyl that I could cut some pieces off for experimentation. I've never really done any applique, reverse or otherwise, but I understand it in concept. I did a quick test and decided I liked the effect, but realized how difficult it was going to be following drawn lines on black vinyl. Then I remembered the freehand embroidery (aka stippling) foot I bought months ago, which I couldn't live without and then forgot I had. One of the methods for using this foot is to affix the artwork you want to "trace" to the fabric using a tear-away stabilizer. Or in my case, plain craft tissue.
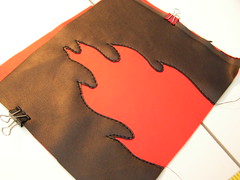 Finding the right artwork was easy for me. I'm not an illustrator, but as a graphic designer/production artist, finding the right illustration is often a part of the job. Found something I liked, made the adjustments needed in Photoshop, and printed the strip of flames on plain paper, splicing together where needed. I taped that down to my cutting table, taped craft tissue over that, and traced in pencil.
Then I made a sandwich on the cutting table of a wide strip of red vinyl, the full piece of 2.5 yards of black vinyl, and the tracing. I did not want to cut out the dress pieces before doing the applique because the screw-up factor was so high. I left it in one piece so I could whack off the 8 or 10 inches at the bottom if needed, and try again higher up.
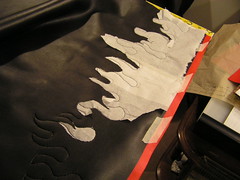 Again, you really can't pin vinyl, so I used masking tape on the front and the back to try to keep the layers together. Especially challenging since I was maneuvering this giant piece around my sewing machine. But I threw it on and managed.
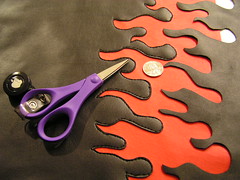
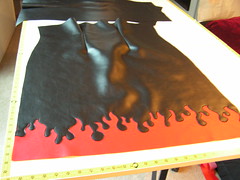
Cut out the dress.
This involved binder clips and careful edge pinning. Cutting the basic dress shape was crucial to deciding whether the placement and scale of the applique really worked. It worked.

Step Five and a Half:
Choose fabric for upper.I hadn't bought any fabric for the upper yet, but knew I could get that locally. Once I knew the thing was actually going to work, I headed back to the fabric store. The first two I narrowed in on were a white sheer with snowflakes (contrast, you know) and a variegated red with little shimmery spots. I couldn't use a plain sheer, that just wouldn't work. I decided the snowflakes (fire + ice) was a little too precious, and went with the red.
Step Six:
Build the dress.
The lower part of the dress could not be simpler. Additionally, I was omitting the zipper (stretch vinyl!) and the hem, so it meant four darts and three seams. Done.
The upper turned out to be more of a challenge than I anticipated, as the pattern calls for facings, which would show through the sheer fabric. Sheer is a PITA in a bunch of ways. I tested some narrow hems and the rolled-hem foot... then went back to one of my old standbys, bias binding. I had some in a color that matched very well, and it turns out, I actually really liked the way it looked at the neck. Bonus.
The two pieces went together without a hitch.
Refit and finish.
I was actually initially concerned that this pattern would be too small for me, because of the whole dumb measurements thing. The vinyl dress actually fit more loosely than the test dress because of the stretch. Plus, it was really intended to be a bit more snug. Trying it on once it was all built together I decided to take a good 2" out of the waist.
After that, all that was left was stitching down the rear vent, trimming the bottom edge straight (no hemming needed) and topstitching where the top and body met. And choosing a pair of shoes.
Your dress turned out beautifully! I hope you were the toast of the evening.
ReplyDelete(PS - I mistakenly posted this comment from my husband's account, so please feel free to delete his name from above here.)
Thank you! Probably the best result was having a friend, also at the party, introduce me to everyone as "my good friend, she made this dress!" as one statement, over and over.
ReplyDeleteWhat a beautiful, hot dress! Great work!
ReplyDeleteAwesome dress!
ReplyDeleteI saw your post with this fabulous dress on Craftster and after reading your blog, I just have to know - What shoes did you wear???
ReplyDeleteI wore matte black leather ankle boots which have modest heels and a little bows on the sides. Good walking boots. Or standing-around boots, as the case actually was. ;)
ReplyDeleteThat dress is superb!
ReplyDeleteYour festivals may start with sparkler shows and different occasions each year, however the enthusiasm for the party is new inevitably.chinese new year food
ReplyDelete