
Wednesday, June 30, 2010
New RH Navbar Option
I've been doing a lot more writing/contributing to MOTORCITYBLOG.net over the past year or so, and I'm notoriously bad at promoting (or mentioning) when I do anything... so I've added my DC-in-Detroit icon to the navigation bar on the right there, which will lead you straight to my original content. Hope you enjoy. Or at least do not die from the overwhelmity.
Tuesday, June 15, 2010
Machine-Embroidered Quilted Coasters
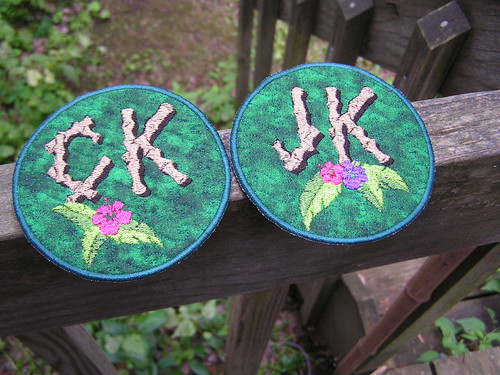
A good friend of mine ran off and eloped last week, and I wanted to make something monogrammed for them, something useful. Since I had already decided to sneak in and leave them some champers and glasses, coasters seemed like a good idea.
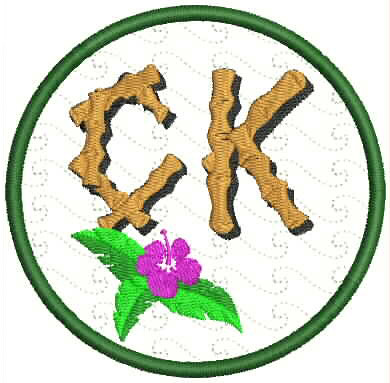
They got married at a big tiki party in Florida, so I also wanted to do something that tied in to that. I lit upon a design using Adobe Illustrator.
With the embroidery software, I broke it down thusly:
For the first time in a while, I actually took pictures during the process! Mostly because I was doing something I'd never done before, and there are a few different ways of doing it. I went the somewhat non-expected path.
Typically, when doing an applique/patch/coaster/whatever, you would put down the die line and then cut out the field fabric and affix it to some stabilizer within the shape. I'd done this with Kelly's Renegade Rescuer patches with varying levels of success.

The concern is that the precut piece will shift around, even with adhesive, and when it's time for the satin-stitched edge, some wovens will blow out at the edges. Additionally, I intended to use a piece of felt under the fabric front, and another piece of felt at the back. Just seemed like too many opportunities to shift around. I saw one tutorial that approached this from a slightly different angle, and decided to give that a go.
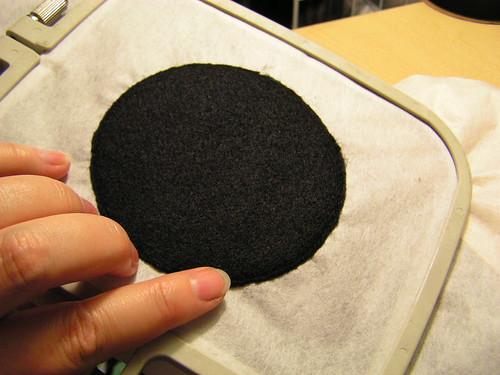
I started with a layer of tear-away stabilizer in the hoop (the tutorial I saw used a heavier water-soluble stabilizer, but I didn't have any) then floated a piece of craft felt and then the upper fabric, a quilting cotton, all adhered with temporary spray adhesive. (I recently realized -- again? -- how often I make sure my fingers are in my crafting pics, for scale.)

The first stitching is the outer shape, just to hold everything together. Then the quilting, to take advantage of the thickness of the felt. I've never done that before, and I think it turned out really cool.

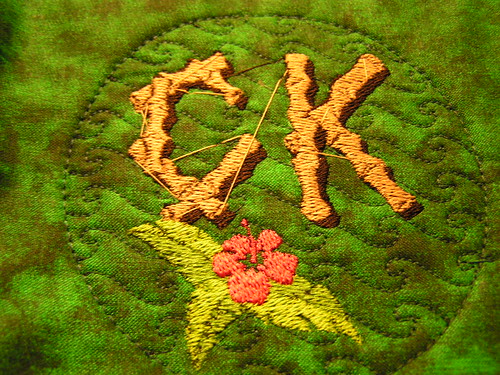
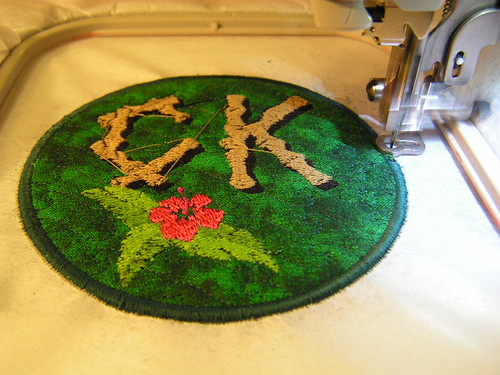
Then the design gets laid down infive six colors.
After that, I removed the hoop from the machine and floated another piece of craft felt to the back (more adhesive). Then another trip around the perimeter to fully attach the back piece.
I should mention: when I did the layout, I made sure to make this layer, the stitching that holds all of the final layers together before trimming, very close to the inside edge of the final satin stitched border, rather than right in the middle where it would be by default. In other words, that stitching will still be covered by the satin stitch after the final border, but is far enough inside that when I trim out all the fabric, the raw edge that will necessarily be left will ALSO be covered by the satin stitch.
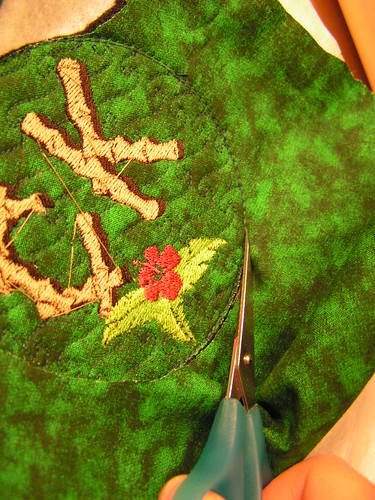
Next comes the pain in the arse: Trimming the shape without unhooping the whole thing. This is where applique scissors would come in handy. Yeah. Sure would. I have a little pair of sharps that I got with the machine, and they served me pretty well.
Gotta get close to that stitching. Be careful: snipping the stitching on the front is not a big deal, but you want to make sure you don't cut through the stabilizer. Try not to snip through the stitching at the back though.
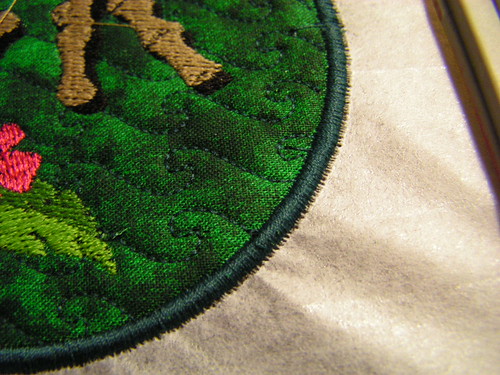
Snapped the hoop back into the machine for the final layer, the outer satin border.
All of the edges nicely encased!
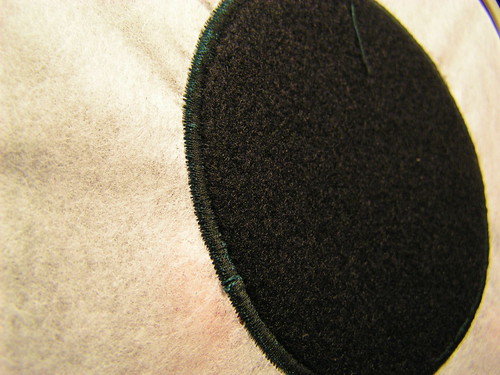
Then I popped the coaster out of the stabilizer and found my nice clean edges to be full of little stabilizer bits. D'oh! This is where I added a step, not mentioned in any of the other tutorials: Fire.
Since the thread I used was 100% polyester, it was an obvious choice. I lit a small candle and ran the fuzzy white edge quickly through the flame, all the way around. Perfect!

Honestly, they look better in person than they do in that photo—in the pic it looks like you can see more white than is accurate. And anyway, it's certainly nothing a green Sharpie couldn't handle. What's most important is that there was no FUZZ.
And the two finished coasters (much truer to color)!
They got married at a big tiki party in Florida, so I also wanted to do something that tied in to that. I lit upon a design using Adobe Illustrator.
With the embroidery software, I broke it down thusly:
For the first time in a while, I actually took pictures during the process! Mostly because I was doing something I'd never done before, and there are a few different ways of doing it. I went the somewhat non-expected path.
Typically, when doing an applique/patch/coaster/whatever, you would put down the die line and then cut out the field fabric and affix it to some stabilizer within the shape. I'd done this with Kelly's Renegade Rescuer patches with varying levels of success.
The concern is that the precut piece will shift around, even with adhesive, and when it's time for the satin-stitched edge, some wovens will blow out at the edges. Additionally, I intended to use a piece of felt under the fabric front, and another piece of felt at the back. Just seemed like too many opportunities to shift around. I saw one tutorial that approached this from a slightly different angle, and decided to give that a go.
I started with a layer of tear-away stabilizer in the hoop (the tutorial I saw used a heavier water-soluble stabilizer, but I didn't have any) then floated a piece of craft felt and then the upper fabric, a quilting cotton, all adhered with temporary spray adhesive. (I recently realized -- again? -- how often I make sure my fingers are in my crafting pics, for scale.)
The first stitching is the outer shape, just to hold everything together. Then the quilting, to take advantage of the thickness of the felt. I've never done that before, and I think it turned out really cool.
Then the design gets laid down in
After that, I removed the hoop from the machine and floated another piece of craft felt to the back (more adhesive). Then another trip around the perimeter to fully attach the back piece.
I should mention: when I did the layout, I made sure to make this layer, the stitching that holds all of the final layers together before trimming, very close to the inside edge of the final satin stitched border, rather than right in the middle where it would be by default. In other words, that stitching will still be covered by the satin stitch after the final border, but is far enough inside that when I trim out all the fabric, the raw edge that will necessarily be left will ALSO be covered by the satin stitch.
Next comes the pain in the arse: Trimming the shape without unhooping the whole thing. This is where applique scissors would come in handy. Yeah. Sure would. I have a little pair of sharps that I got with the machine, and they served me pretty well.
Gotta get close to that stitching. Be careful: snipping the stitching on the front is not a big deal, but you want to make sure you don't cut through the stabilizer. Try not to snip through the stitching at the back though.
Snapped the hoop back into the machine for the final layer, the outer satin border.
All of the edges nicely encased!
Then I popped the coaster out of the stabilizer and found my nice clean edges to be full of little stabilizer bits. D'oh! This is where I added a step, not mentioned in any of the other tutorials: Fire.
Since the thread I used was 100% polyester, it was an obvious choice. I lit a small candle and ran the fuzzy white edge quickly through the flame, all the way around. Perfect!
Honestly, they look better in person than they do in that photo—in the pic it looks like you can see more white than is accurate. And anyway, it's certainly nothing a green Sharpie couldn't handle. What's most important is that there was no FUZZ.
And the two finished coasters (much truer to color)!
Tuesday, June 01, 2010
Here's something I've done lately...
Yes, I actually HAVE done something lately! In fact, that's why it's been so quiet around here.
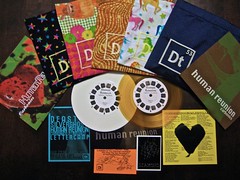
I got a commision (hi, JRC!) to make a series of 50 embroidered and sewn fabric sleeves for a limited-edition 7" record. (Yes, I said record.) I converted the Five Three Dial Tone logo to PES format myself, for use with my Sofia. Then embroidered and sewed all 50 in some of the most garish and ridiculous fabrics imaginable. The selections were JRC's doing. Also the glow-in-the-dark embroidery thread was all JRC.
They turned out well, considering I did the embroidery without stabilizer (to keep costs down). The sleeves are not lined, but all seams are contained in French seams.
I hear the release party went well, and that the records were "flying off the shelf." I couldn't make the party myself because I was committed to the big Steampunk Expo that same night. Yes, I made something to wear to that, too... which I'll try to get photos of sometime. The only pics I have so far include me, and are just too... weird to share.
Subscribe to:
Posts (Atom)