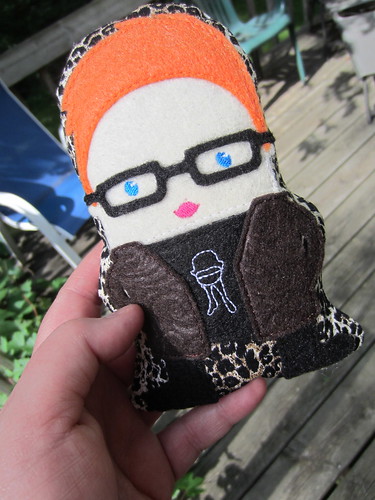
I have a friend, Rob, who moved out of my town a few months ago. I'd had this project in mind right about since he pulled away. There are some people who lend themselves easier to cartooning than others — Rob is one of the easy ones. He has several easily-distinguishable characteristics; bright blue eyes, black eyeglasses, an adorable strawberry mouth, and most horrifyingly of all, he's a natural ginger.
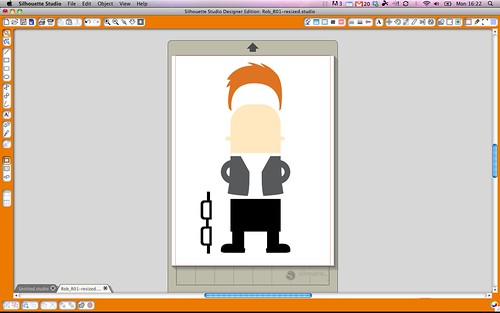
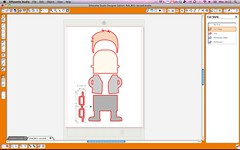
I'd never made a doll of a person before, but the setup came to me quickly. And it started in Adobe Illustrator.

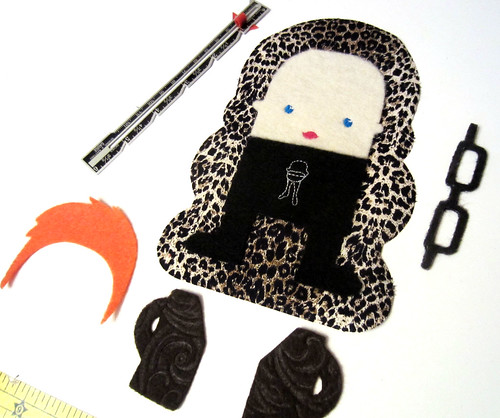
I had intended to hand-cut the felt for the [counting] 6 pieces that make up the illustration. As I was contemplating how I would transfer the cutlines to the felt (probably by printing on plain paper, lightly spray-adhering the paper to the back side of the felt, and scissor-cutting along the lines), something came to my attention: The Silhouette Portrait (and the bigger one, the Cameo). Silhouette was in the midst of a big blog giveaway, and I must have entered to win the thing about 100 times at 20 blogs over the course of a week. By the time all the sweepstakes were over, I hadn't won, but I was convinced I was buying one, especially when I found out fabric-cutting was an on-label use.
The included free Silhouette Studio software does a lot, but it doesn't do what I really needed, which was to import Illustrator (vector) files, while maintaining editability. The upgraded Studio software does, however, and does it quite well.
 At my local Joann, I picked out some felt colors that I thought suited him well, including a nifty embossed brown felt for the jacket. (I was thinking plaid, but that just wasn't going to come together well enough.)
Then it was cuttin' time!
The Silhouette Portrait I got was the fabric-cutting bundle, which included two types of fusible interfacing and a fabric-specific cutting blade. Looking around the site, I didn't find any recommendations for felt, which as you know, is a different animal from your typical quilting cottons. I think because the fabric bundle is a relatively new thing, there isn't yet a lot of chatter about it, at least not where I looked. When I didn't find the details I was looking for, I decided screw it, I'll just forge ahead.
Silhouette sells two kinds of fusible interfacing, one intended for the cleanest cuts, and a slightly lighter weight version intended to be more easily sewable. I did a test of the clean-cut version fused to the back of a sample of craft felt (which is relatively thin) with the fabric blade set to the deepest setting, 10. It cut beautifully.
Now, about his sweet little face.
As I've mentioned hundreds of times, I have an embroidery machine (hi, Rudy!). I intended to embroider the little details of the eyes and mouth right from the start. What I had to figure out was how to do it to register the shapes between the embroiderer and the cutterer. What I wound up doing was executing the embroidery first on a big piece of fleshy-colored felt. Then I took advantage of an awesome feature of the Silhouette Studio software, the print-and-cut.
The way that works is that you print your design from your inkjet (or whatever), including registration marks in the corners (which Studio automatically puts in place). Then, you stick your printed paper on the cutting mat, and the Silhouette actually scans the page for the registration corners, and then cuts appropriately. I'd tested out that feature a couple of times, and found it remarkably accurate and consistent. I printed the face shape, with eyes and mouth in place, on plain paper with registration marks. I stuck that down in place on the carrier mat, then spray-adhered the Wonder Under-backed embroidered felt on top of the outline, inside of the printed registration marks, registering the eyes and mouth (on a light table).
Got it?
With that in place, the Silhouette scanned the registration marks, and cut the face out correctly, first-go.
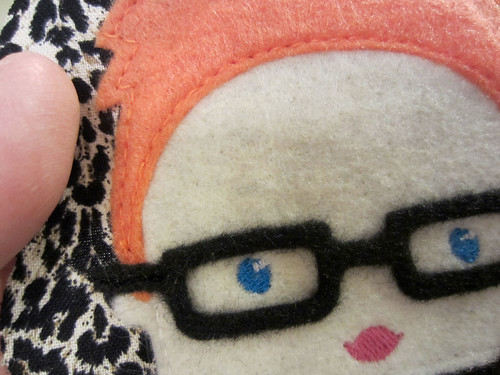
Have you ever seen anything more adorable? No, you have not.
At this point, it was just a matter of sandwiching the layers together, in place on the leopard backing, and pressing it together to adhere the Wonder Under.
Or so I thought.
I wasn't happy with the level of adherence from the Wonder Under alone, so I decided to hand-stitch around the perimeter. That lasted about 4 stitches before I realized how much of a mess that was going to be. It's not that I don't enjoy hand-stitching — I actually do — but it takes ages, and I'm not always good about keeping the stitches even. Believe it or not, I'm much better at doing extreme details with my trusty Husqvarna (hi, Nigel!). Using matching threads, I stitched around the hair, face, jacket, and shirt/pants.
Oh! I forgot about the shirt!
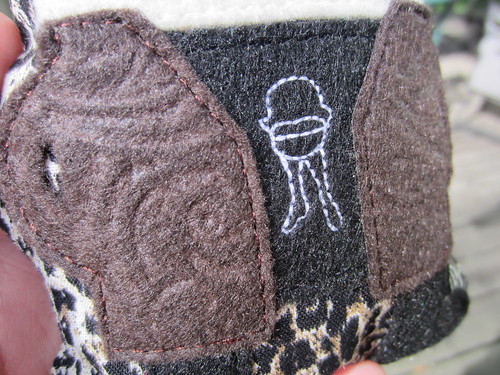 I couldn't just put him in a plain t-shirt, so I wanted to find a good symbol that would read at only 1" high (and skinny). Rob is a bigtime movie guy, and I happen to know that his favorite movie is The Discreet Charm of the Bourgeoisie. Not exactly privileged information; he has a tattoo of the poster image on his arm.
I took the image, broke it down to one color, outlined it, and converted it for embrawdry. As the registration was less tricky for this part — it just needed to be centered — I cut the shirt/pants shape out first before embroidering the obviously-simplified icon.
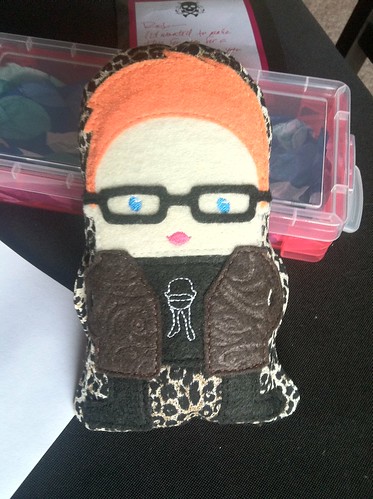
Now firmly stitched down to the background shape, I stitched, turned, and stuffed in the traditional way. And voila! My little Rob doll.
I found a little snap-top container that he just fit inside, coffin-style, and sent him off to Rob's new home on the other side of the country.
Yes, of course I gave it away. I wanted to make it for Rob, and so it needed to wing its way to him. I hope they're very happy together.
PS The Silhouette Portrait, which is the smaller model, is tiny and lightweight. Portable enough that I could find a place for it in the sometime-chaos of my work table.