UPDATE:
UPDATE:
I did a project this weekend which serves as a great example of the typical steps I take in order to create a machine embroidery pattern. I'm going to break it down into steps.
Step 1: Inspiration, aka, I am invited to a special event.
In this case, it's a fundraiser for the Belle Isle Aquarium, as they attempt to bring back an electric eel to the country's oldest public aquarium. When I make something for myself, it almost always starts as a special event to which I want to wear something I made. I feel positively naked without something I made.
Step 2: Research/concept.
Electric eel, that's easy. I mean, it's easy because electric eels are
awesome. (That reminds me, I gotta email John that video of the electric eel accidentally killing that alligator.) Turns out, electric eels are more catfish than eel. I don't feel like I need to know the whole biology of the creatures, but I want to at least know what they look like, and what their distinguishing features are.
Assumptions are the enemy. (If there is one thing in my life that defines me as a "skeptic," if not a crafter, it's that statement right there.)
So I watched a few videos, looked at a bunch of pictures, and thought about how I would represent it. I veered both literal and figurative.
I think
electric, I think
lights. Although cartoonists love to show them with lightning bolts and beams coming off of them, electric eels don't actually light up at all themselves. (
Bioluminescence is a whole different thing — if you haven't looked into it yet, do yourself the favor! Natural bioluminescence is incredible and fascinating and gorrrrrrgeous, all at once.) However, they
can be used to power lights. Every year, a new video comes out of an electric eel powering a Christmas tree (usually in Japan, dog love 'em). I love lighting things up, as is proven by the fact that I have a small drawer with 6 or 8 little LED light strings tucked away for future use. I set a couple of those aside.
My first concept was to take a western-style shirt with front yokes, and do a cartoony eel with lightning bolts embroidered on either side. Those sorts of pics kept coming up in my searches, and I even found a couple of Tesla-riding-electric-eel illustrations to choose from. To my immense shock (heh), I did not have a plain western-style shirt in my stock. (And by "stock" I mean "closet." And by "closet" I mean "the third bedroom of my house which serves as my dressing room.") I had neither the time nor the inclination to make a shirt from scratch, neither to buy one, so that idea was out.
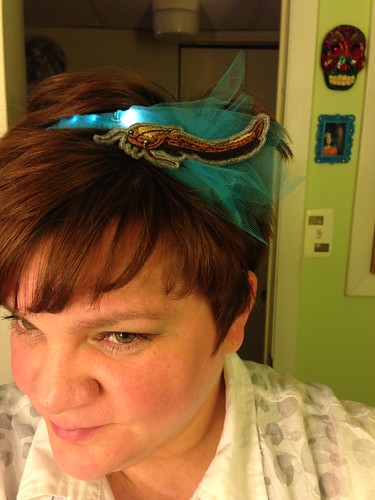
Second thought was to do a hairpiece. I have very short hair, so putting things in my hair/on my head is always a pretty high priority. (Wait, that's not really a short hair thing is it? In any case, I do.) Since I've practiced/developed a pretty good technique for embroidering on felt, making hair decorations has become a favorite quick-and-satisfying go-to project for me. I decided on a headband. With lights.
Step 3: Illustration.
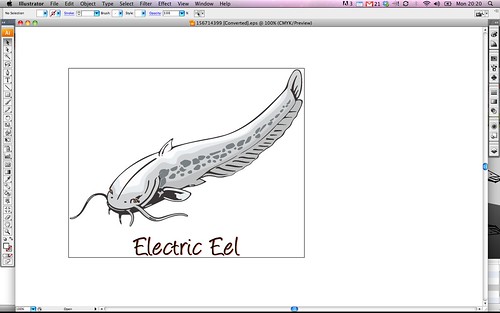
Because I was going to an aquarium to be speaking with docents and other experts, I abandoned the fanciful "electric eel" concept for the more accurate. I was a little surprised to find a couple examples of vector clip art specific to the electric eel; frankly, they are neither attractive nor especially interesting to look at. As is so often the case, personality wins out, and interested some people enough to do realistic representations. I acquired this one from Thinkstock as a vector illustration, shown here opened in Adobe Illustrator.
Step 4: Color assignment.
Electric eels are brown. Just...brown. As you can see, the clip art there uses 6 different shades of grey, making the shading look more variegated than do the actual eels. At this point, I can decide whether I want to choose as many colors as I need to suit the design, or to limit the design to fit the colors available (or feasible).
I checked my grandmother's antique spool cabinet where I keep my good thread to see how many browns I had available. When it comes to thread color palettes, there are a couple of things to consider in addition to color, specifically weight and sheen. Because we're talking eel, I wanted to use only shiny threads, so I stuck with 40 weight rayon/viscose. (This is merely one of many niggling details that I will overshare.) This left me with 4 browns, plus black for the outline and details.
The background is the final significant color choice. As I said, I've had great results embroidering on felt, which is both weighty enough to stand alone, and non-raveling to allow for a clean border. I checked my stash for something maybe a watery blue...and found a stone-embossed medium grey, which struck me as a good background for this bottom-dwelling creature.
Knowing what I know about aquariums (one of the first things I look for when traveling to a new city is whether they have an aquarium where I can spend an hour or two), I anticipated the lighting to be fairly low, the bulk of the ambient light coming from within the exhibits. This would allow the browns to blend in to each other, without the whole thing getting lost in total darkness.
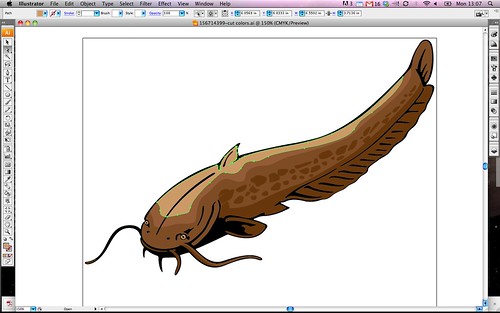
Step 5: Re-illustration.
With an idea of what the animal actually looks like, technical and feasible restrictions, it was time to colorize and simplify the original illustration. I've talked about using Adobe Illustrator before, and how it's one of my favorite crafting tools. It was an absolute must for me to be able to use Illustrator as a primary prep tool before starting an embroidery pattern, for this reason.
Starting with the original, I selected the areas to be colored, simplified some of the details (remember, we're talking about a 4" x 4" maximum area, and embroidery machines don't have nearly the resolution of your desktop printer), and removed overlaps. In some cases, stitching one color over another is acceptable — even desired. But what we have here is large areas of solid color on felt, with details on top of
that. More than 2 layers of heavy stitching overlapped tempts a big ol' mess of broken needles and thready birdnests.
Step 6: Import and edit and edit and edit.
At this point, I saved the Adobe Illustrator file from my Mac to a thumb drive to sneakernet over to my totally-unplugged-from-everything-because-it's-so-old-it-will-just-crash-everything Dell laptop, where I reopened it in Illustrator on the PC. The illustration was resized to under 4", and then reduced by another 85% for resolution reasons I don't quite understand. From there, I selected one shape at a time to copy and then paste into the embroidery software. The software I have does a great job of auto-converting a basic shape, so that's where it all starts.
Copy a shape, paste a shape, convert a shape. Next...
Then, of course, each shape is going to need ordering and tweaking. After...honestly, I don't even know how long it took because this is the part where I tend to go all zen and start fidgeting with things at 800%...and this is where we wind up in the embroidery software.
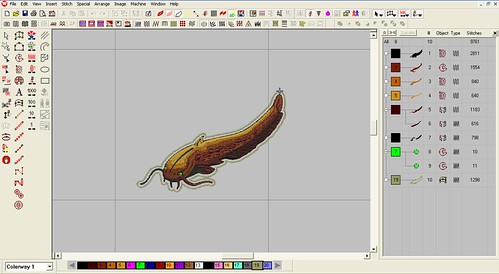
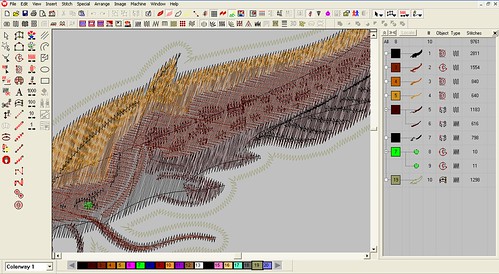
This is the stitch view. One thing that is significant/fun about embroidery, vs typical graphic design, is the textures available simply by stitching the same color in a different direction. This software simulates/supports this, and so I wanted to take advantage of the option to give more dimensionality to the slippery critter.
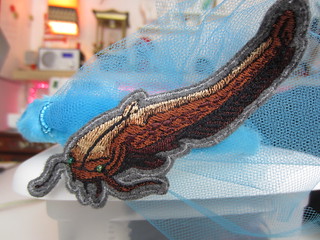
Rather chaotic, no? The panel on the right side shows the stitch sequence. It's very important that the objects are stitched in the right order; sometimes for layering, sometimes just to minimize jumps between areas. The 8th and 9th objects are simply green circles for the eyes. The 10th object is a satin stitch outline which serves as a fence for me to cut around when he's all finished.
You may also notice that black gets stitched twice, first as the background/outline, and then as additional detail. I actually used two different blacks for that — lightweight bobbin black for the background/outline, and 40wt for the details, so they'd stand up as the spines would.
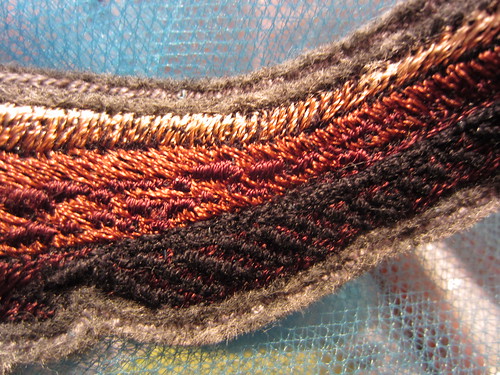
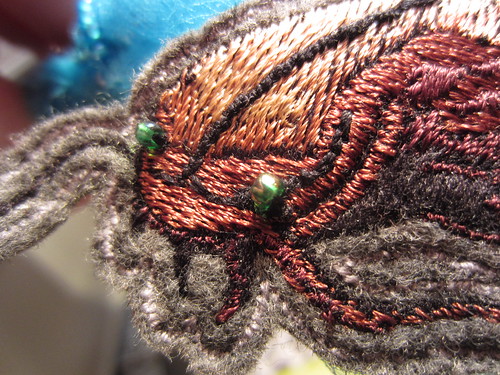
The final outline was done in a grey matching the felt to give me a border to follow for trimming. Here it is all stitched out and trimmed, with green glass beads for his eyes, and human hand for scale.
Step 7: Finishing.
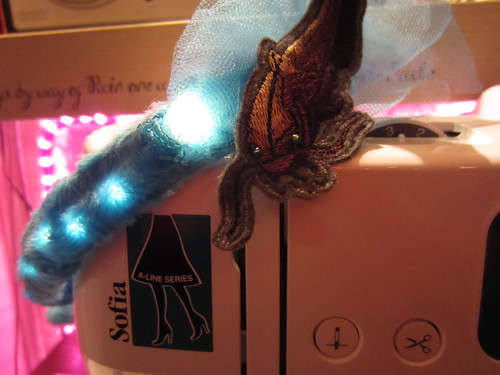
I already had a headband picked out for this project, a two-bar deal with some scrolly connectors between. This meant it was wide enough to support what I wanted, with openings for me to stitch through.
I don't really have any photos of this step, but trust me, it's not very interesting. I had a 7-light LED string from Ikea in the drawer which I stuck through the openings, and stitched in place with regular thread.
(I will never understand why people will choose messy, unreliable hot glue when hand-stitching is so much easier and non-destructive.) I wanted a fabric to go over the lights to represent water, and to diffuse the white LEDs a bit, so I chose this short-pile blue faux fur I had. A large part of that decision was down to it being what I had on hand, but additionally, the swirly pattern looked pretty cool and watery over the lights.
I hand-stitched the fabric down, trimming and ladder-stitching as I went (while watching some non-"The Thing" arctic-station-gone-wrong movie). I pulled two of the lights through a small slit in the fabric so they would be extra-bright right next to the eel, to show him off a little. Then I took a tuft of light blue tulle, of which I have several yards for completely unknown reasons, and put that down for a little splash and for something to stand the eel against. (Yeah, there are a few beads in there, too.)
Here's a close up so you can see what a difference layering and varying the stitch direction makes.
And his adorably alien little face.
With the lights on, in a fairly accurate simulation of the light at the event.
The "underwater" lights.
So there you go, the anatomy of the ultimate in one-time-use wearables. Oh, it's perfectly capable of being worn again and again, but where am I going to be inspired to wear an electric eel on my head again?
hahahaha Considering that I wear eyeballs and skeletal birds in my hair on a regular basis, this is actually not so hypothetical a question...

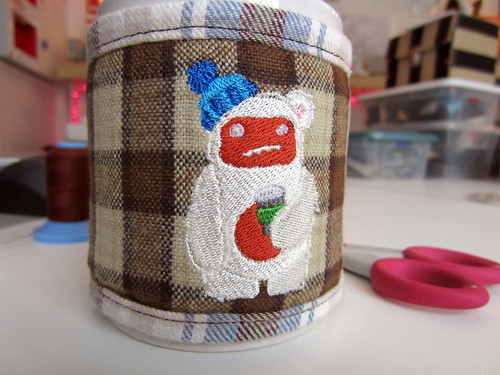
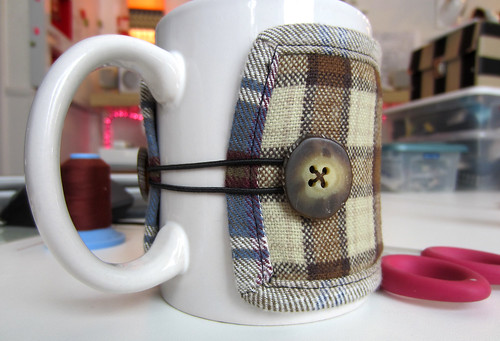
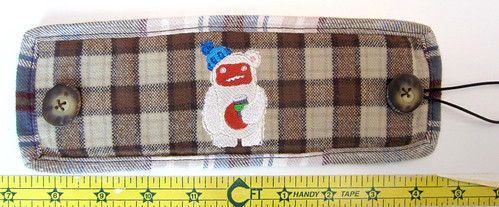 I also knew that there were a couple of Bigfoot machine embroidery designs in my collection, from my favorite purchased embroidery source Urban Threads. The Latte Yeti was the obvious choice. As for fabric, Paul is a huntin' kinda guy, so I dug up some flannel shirt scraps I had for the main body, with a strip of felt in between for insulation.
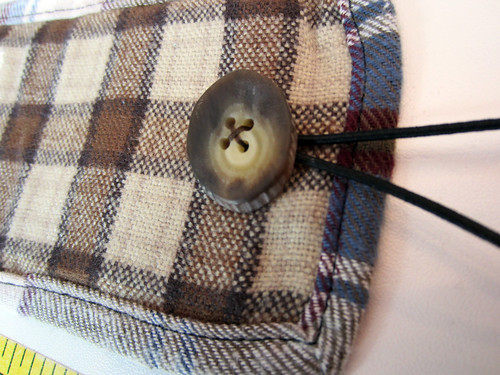 I decided to use a self-binding technique that's often used on receiving blankets, which I've done a couple of times before. (See my embroidered placemats post for more details.) Starting with a standard mug, I measured around the body, omitting the handles, and then the full height. The flat mug warmer is about 9" x 3", which then wraps around the mug, and then is held in place with a round elastic.